Tuesday, March 04, 2014

Smart Relay Controller Project

This project presents a alternative way to control the enable and disable of temporized wiper operation present in most cars, specially those who do not have some temporized wiper. It work by identification of extra command in the wash key of cars. Most of the ordinary cars (VW is bright on this, in Gol line in Brazil), came without the option to enable timed operation of the wiper in the controls in the drive wheel. The VW typically suppress one of the 4 function switch to control the wiper/washer, eliminating temporized mode. Even new cars came without this. If it is purposely, to segment the market or to reduce cost, I don't know and is beyond this article to search why they do that.

Since I live in a rainy region, I want that temporized mode. It is boring to have to enable manually the wiper in intervals. Let it work in slow mode in low rain condition, cause it to generate noise due the clean rubber working in dry condition.

Typically, the wiper stick behind the steering wheel of most cars here contains 5 (4 if you don’t count the stop mode) position/options (in order) (HTML li does not start from 0, but from 1, damn):
  1. Stopped (I don’t count )
  2. Timed wiper – enable wiper to work between T seconds
  3. Slow Operation mode
  4. Fast Operation mode
  5. Window Wash mode (front push to enable the wash and the wiper work for 4 seconds)
  6. Back Window Wash mode (back push to enable, with toggle function to enable/disable back wiper and wash)
There are two functions in this list that are controlled by one single relay: the 2 and 5. Economic cars came without the 2 option. They suppress the relay and use just a jump, which cause the lack of retard in wiper when you wash the window. Sometimes the relay is present, but they don’t install the panel control switch with all positions. To enable such function, you should change the switches behind the steering wheel, and probably install one more cable from the panel to the relay box to enable the option. I would not want to spend money buying new control sticks to enable timed wiper mode. Badly could be install ugly switches to enable that option at the car panel. So I thought in another option… The first option cloud be change of slow switch position to temporized operation. However I would not want to lose functions; i want to add!

Another option was use of the Window Wash pull switch to enable the operation of the timed mode. There is in the market, toggle relays, to enable the operation of the back window wiper (with a fifth position in the control stick, push to back). However, that could make the use of the wash window hard, and the need of additional relay to enable the toggle, as well as modifications in the relay box to accommodate the new relay. I also don't want that.

So in the spirit of hacker, I so got in the idea of change the original relay, put a microprocessor, and add double click detection on wash switch... and solve my problem, adding functionality and avoiding the elimination of functions!

Since I couldn’t find anything ready on the shelf, I decide develop a solution for such! Initially, I develop the double click and long click detection. Double click activate/deactivate the temporized mode. Long click still turn on the washer/wiper for some seconds as original. In further increments I enable the variable wiper work mode, without the use of any additional switches!

Below I present all the development of such device, that I chose share! The decisions, steps involved, block diagrams, state machines and everything else. I start checking how wiper/wash relay is plugged into relay box and how it works. Typical wiper/wash relay is based on U641B chip. It is an 8 pin analog dip chip which care of temporized wiper/wash operation. Figure 1 show the details of typical circuit. This image is from Atmel datasheet. I believe that other companies manufacture it too.


Bosch relays use this chip. So, in order to create my solution, I should develop a substitute for such chip. I had two main option to do that. With sequential logic, or with software. Since I am a prominent programmer, and love assembler I did it in software. I had in hands during the development some Microchip PIC microcontrollers, 16f677a. So I develop the initial idea on them. When the development got in a nice point, I decide to move to a small chip, which could fit inside the small relay closure without many changes. Adjusting the code and moved to pic12f675 (8 pin DIP) chip, which was the most easily found on stores nearby.

However, the program could be, with some work, easily adapted to the less expensive device from microchip, as the 10f200. But to use this chip, you have to get rid of the interruption routines, which are not present in 10f200 line. So a move in that direction could need changes (resembles almost and Atari programming’s counting cycles to get accurate timing ).

Basic block ideas

The initial ideas born as block diagrams to a state machine, and are presented below. The basic block diagram born somewhere in the process. So I will present the basic state machine to control, block diagram, and the top state machine. (there are 2 main state machines).

With the basic idea of the device, I wrote down on paper the details which I wish that system should had:
  • The chip should work normally on systems which had the timed switch.
  • The wash mode should work normally, activating the wiper continuously for 4 seconds (S) when the wash switch pass 0.6 seconds ON (LONG CLICK). (not enable the wash mode if is bellow this)
  • The double click should be detected efficiently and naturally (DCLICK). A time window should be efficient in detect variables double clicks. The first click must be below 0.6 seconds, to not cause ambigueties.
  • The enable of temporized wiper mode (TEMPO) by the default switch should overthrow the double click mode.
  • The double click should not have influence when the system was working in tempo wiper mode by the default switch.
  • The 3th click on the wash, right after the double click should control the interval between windows clean, up to a 15 second window. Is nothing happen in this time, the system will work in 15 second interval, until user double clicks again to disable the temporized mode.
Defined these basic behavior’s, I create a state machine, which further became the brain of the thing. Below in the figure 2 are the basics of state machine. They are not perfect, and even has some misconceptions on the ideas for a state machine. But they suits my needs perfectly. These machines generate events who are treated the the next state machine.


These block shown the the kind of messages that I should gen and thread. The overall block diagram of the system is in figure 3.


I needed still establish the block that process the generated the events from the initial event machine. The events are:

• CLICK – user click the wash switch, but release before TMaxOn seconds (0.6 seconds). This event is toggle each time it happens, but it should be cleaned when treated by the Main Event state machine.

• LONG_CLICK – user click greater than TMaxOn. This event is set and clean by the Event Generator.

• DOUBLE_CLICK – double click, recognized when click is less than TMaxOn and off interval is less than TMaxOff. This event is toggle each time the event generator identifies it

• TEMPO – user activate the tempo switch The state machine that controls such behavior is presented in figure 4. This event disable other events, but the LONG_CLICK.

There are also some time diagrams. The CLICK event:


The LONG_CLICK


The DOUBLE CLICK


The variable names may be a little imprecise. These are the main process example of work after receiving a click from the keys. There is also a software debounce routine running in background, for each one of the two keys (ch1 and ch2), to easily threat the noise data that possible could come from cheap switches present in cars. I prefer use software to and analog solution for such, keeping small part count.


The debouching used is in the diagram of figure 4 and was explained in one post I did some years ago. The outside numbers represent the signal coming from the outside world. The inside numbers in the diagram represent the signal passed to the next block inside the process. By the way, all the diagrams were made with DIA program. Very nice and free!

The event handling is done by this state machine:


They state machines for handling the messages are split in two, because Wash is run in parallel with the Timed Wiper mode. However they run in the same mainloop of the program.

Main Program Details

The program was all implemented in PIC assembler. The overall description of the development of the program is the follow:

  • main event handling: run in the main loop, since it attend the events from the event generation process.
  • event generation process: use an timed routine, with execute every 20ms, and get key state from the debounce.
  • debounce routine: runs at 5ms, also in timed routine, treating switches states.
  • A timer counter of the PIC is configured to increase each 256ms, and top byte only is used, being used by event management, who can be reset,set and read it. I believe I can eliminate this. I even do not remember if I already don't sweep this out.
I make the code in PIC ASM, and I am releasing it, making available for anyone. You can read, change, and learn, if possible.I believe that it is well readable. It is configured to work for the Microchip 12f675. However it can work with almost any microchip chip. It needs just one interruption with is configured in counter for main process (in 5ms) and one counter for the top state machines control the wiper. However I believe that the second counter could be eliminate, since the main counter running in 5ms is pretty nice.

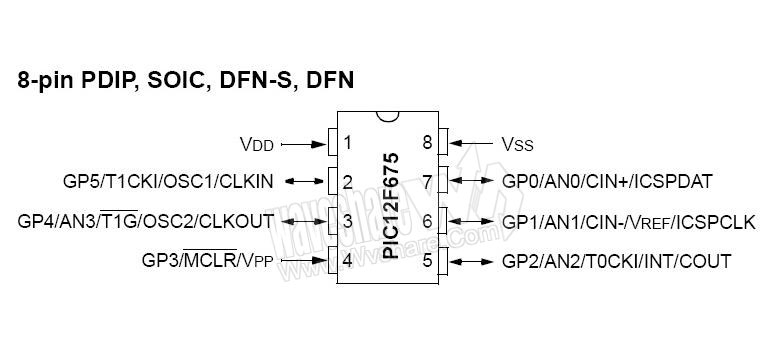
Some tips about the pins used in this version of the code, that is adjusted for PIC12F675.
All bits are in PORTA (or GP pins as Microchip like call):

GP0 (in) - wash key (PIN 7)
GP1 (in)- tempo key (PIN 6)
GP2 (out) - out to driver (PIN 5)
GP5 (out) - was used to check the itnerruption frequency

I'm pasting this picture of the pic from other site. It may get out of work eventually...

CODE LINK - I used dropbox, but if it does not work, tell me.


The photo below  was one of the first version of the device, already with PIC12F675. A pin was used to generate a wave signal, who is commented in the start of the interruption routine, to know if the interruption routine was running fine, in desired time interval. It was =). To clock everything, was used the internal oscillator of the chip, which run in 4MHz. It is pretty stable for this use.


The basic schematic for the circuit is below. Sorry the poorer details in schematic. The 2 power supplies are there just to remember that the 12V from the battery need to be down converted, either with a Zener or a 7805. I used a Zener for some time, as the current need for the PIC are pretty low. The relay is pluged in 12V supply, so a 1K or higgher resistor is required in the base of the NPN transistor. The signal of the keys, S1 and S2, need to be reduce, in order to drive the input pins too. If no, you can kill the PIC chip. I used a simple divisor, with 2k2 and 4k7 resistors.


A etched some boards for this circuit at home. I could not find anymore the photos of the other versions and prototypes I did. I manufacture also some boards also in a professional company. If someone want, I have them available for any value, for use. I even try some different configurations for the boards. The top left I etched home, but it is not the one I send to professional etching. This board version uses Zener, but the new one use 7805 package in TO-72.


Final Considerations

This project was done by me in 2010. Is born because the lack of functionally in our cars. It was a very nice develop process, for me. I take less than a month to get ready. I spent many time looking to the possibility of manufacture this, but I give up. I learn some interesting things with this project too.

At that time, I try to sell the idea to some of the manufactures of relays in the country. No one wanted. One company get in touch with me, but they simple give up. So I got really unmotivated at time. I stop build any project.

I decide to share it soon after, but I never felt that it was ready to share. Well, I am sharing it now. May be some mistakes in the text (sorry the poor English). Please, tell me if you want to know something, or if I wrote some really bad. I really believe that the idea can be re-purposed. The first thing that came into my mind is that the double click could be used as garage opener option against ugly switches in car panel. Even other uses.
I am glad in share this with the community. I hope that you enjoyed it! Specially reading the code!

Friday, February 28, 2014

Speeding up code with SSE instructions - A Journey

Everything start from the reading of Fast Calculation of Inverse Square Root (FCISR) from codemaestro. The fast square root is a great history about computer graphics, games and computer industry. The clever use of mathematics and binary to solve hard problems. There are several articles that try to explain "easily" how the fast method works. But not all them are that easy to understand. All them stat the use of Newton approximation, which I know barely, but I could not understand fine the mathematics decomposition of most PDF articles found on net. But the Wikipedia post was the savior, with the straight and clear description of the technique. At least the missing points in the other explanations.

Well, but I don't wanted to re-implement the Fast Square Root. I wanted understand it and put that fast calculations inside my 3D vector and matrix code. I assumed that this is already well developed in any CPU, and some readings pointed that SSE instructions use that. The graphics processors also use that technique for calculation as I read in some place. I know that GPU is great for heavy calculations (CUDA). But I wanted optimize some calculations in my program, via CPU resources.

I decide to try learn SSE, maybe to use fast square root (that was a entry point), but specially to use all the other goods that SSE offer. I already know from long time SSE, but from the theory to real thing, is not that easy some times. Yes, I know. I should be doing more important thing that rebuild the wheel. There are tons of vector classes on internet. I even believe that some implement their calculations via SSE. I try to believe also that VC and other compilers optimize code to run nicely with SSE. But I also read somewhere that MS VC compilers do not optimize the codes in that good way. So, I wanted test if was possible to a simple mortal programmer to use SSE.

I will here just share some tips about the SSE usage, errors found during compilations, how I solve them, and related things that may help the start usage of SSE. When I talk about SSE, i mean SSE2, SSE3, SSE4. I surely used just SSE1 and 2. I think I didn't used any SSE2 instruction, as they are only extents for variable of the type double. Upper levels of SSE are even more specific yet, to DSP instructions.

MY ENVIROMENT
My classes are basic vector (no template based), 3 and 4 elements. The matrix class are 4x4 elements. All are floats. All my tests where in MS VC 2010. Matrix calculations are heavy, as well as vector. I spend a entire Sunday looking, reading and trying to use the SSE operators. I am not going to cover details about how SSE works. There are tons of sites on net about this. A supply a link to a Book Chapter that help me in some poitns, Microsoft MSDN which help a lot, TuomasTonteri (from Filand I think) which supply nice examples where I start in. Other sites will be linked in text. 

STARTING
To start, you need just include in your code:

#include "xmmintrin.h"
#include
"fvec.h" // contains overload to basic operators
  • xmmintrin contain instrinsics that help you to generate code without have to write in assembler.
  • fvec are Intel helpers, that simplify the use of SSE. I suggest to not try use direct assembler in your code.
The first thing to mention is that tests suggest that the SSE flag in code compilation seens to only cause code without SSE explicity to NOT use SSE. The option in question is:

Configuration Properties>C/C++>Code generation>Enable Enhanced Instruction Set

This is weird, but i tried to keep it enabled. The VC 2013 spec point that that is the default mode of the compiler, if you not set it. Enabling this, if you can get /clr error, then maybe is because you project OR SOME C FILE have the option enabled. I have to check all my C files, to find that one had this option ON, who caused me many headaches in find from where /clr error was coming.

Also in the same tab, you should enable Struct Member Alignment to 16 byte. However don't spect to this option solve your problems. Documentation stats that this may not work well, and is no guarantee that the data will be aligned. Even if you declare you variables as static :( I could not achieve data alignment using this option. I had to use __declspec( align( 16 ) )  in my class definitions, or the __aligned_malloc to dynamic allocations. I overload the new operator to do that. If they are not aligned, a exception is throw in your code when you call SSE load functions.

BASIC INSTRUCTIONS
The basic steps to use SSE are load the registers with your data, compute what you want and save back to know variables. To load data, you have to use the _mm_load_ps. Again, this instruction need the data to be aligned with the 16 byte boundary. To initial tests I use _mm_loadu_ps, which load unaligned data to SSE register. When the calculations are done, you can store back the data in your variables.

The store option are _mm_store_ps and _mm_storeu_ps (for unaligned data). Be aware that the use of 'u' versions is highly inadvisable, as will reduce the speed of data transfer to SSE registers, making it useless in speed. There are other options of load and store. These are the four I tested. The vec class of Intel provides basic data typed to help in the fill of the variables, so there is not need to use assembly language to fill the SSE registers. It is a level up to use of direct intrinsics.

ABOUT ALIGMENT
The MSDN documentation stat the use of align declaration in from of your class to force correct memory alignments. I was unable to use such initially, as my code compilation shown several errors, mainly in typedef of the main class, saying in function definitions that data was misaligned. Oh good, so many fuzzy errors.
But I then removed the alignment information of the main class, create a new typedef for the class and used there the align definition. See the simplified example below.

// Vector class, who is derived by others, and I cannot force aligment, as this avoid
// that this data be passed as parameter in fucntions (because they have to do to stack)
class vector4f {......};
 // A typical derivation I use
typedef COLOR vectro4f;

// Here I made the trick, create a version aligned
typedef __declspec( align( 16 ) ) vector4f vec4;

With the above, I was able to create a derived class aligned in the memory boundary!
I tested the aligment with this simple test

#define IsAligned(address) ((unsigned long)(address) & 15)
return 0 if aligned, other else

This kind of message is common when you try pass your aligned class as parameter to a function. Before a fix as above, my code compilation became full of this:
error C2719: 'vecA': formal parameter with __declspec(align('16')) won't be aligned basic.h

 After goggling, I found the problem as a know issue. I even not feel right in calling this a issue. Its more a behavior. A post about this tell why. Several other posts bring the same information about the workaround to solve this. Aligned data can be passed only by reference to other functions. Aligned data cannot be passed as argument. Makes sense to me, as the data is put on stack to be passed to a function cannot be aligned, as stack cannot be aligned on 16 bytes boundaries. Maybe eventually. Well, I will have to do a huge change in all my code to use pointers. I even can't imagine the work to do this on vec3 and all the uses I do with it! But I believe it worth, if the speed gains were good.


MATRICES TESTS
Test of each kind were perform 10000 operations of each kind. The tests were done in VC 2010 in release mode with /O2 (max speed), varying some configurations in VC. All matrices are 4x4. All the times reported are in seconds.

I first tested matrix multiplications in form A=A*B. I test if SSE could improve the performance of my code. I used float multiplications version from hfrt. The time for the test was of 0.000286 seconds. So I unroll the code, as several sites and even Intel suggest to unroll code and put together calls by type, to optimize the use and preemption of code load.

Code
    void mmul_sse_unroll(const float * a, const float * b)//, float * r)
    {
        __m128 s0, x0, x1, x2, x3, r_line;
       
        // unroll the first step of the loop to avoid having to initialize r_line to zero
        // carrego apenas uma vez
        x0 = _mm_load_ps(a);         // a_line = vec4(column(a, 0))
        x1 = _mm_load_ps(&a[4]); // a_line = vec4(column(a, j))
        x2 = _mm_load_ps(&a[8]); // a_line = vec4(column(a, j))
        x3 = _mm_load_ps(&a[12]); // a_line = vec4(column(a, j))

        for (int i=0; i<16 br="" i="">        {
            s0 = _mm_set1_ps(b[i]);      // b_line = vec4(b[i][0])
            r_line = _mm_mul_ps(x0, s0); // r_line = a_line * b_line
           
            s0 = _mm_set1_ps(b[i+1]);  // b_line = vec4(b[i][j])
            r_line = _mm_add_ps(_mm_mul_ps(x1, s0), r_line);
           
            s0 = _mm_set1_ps(b[i+2]);  // b_line = vec4(b[i][j])
            r_line = _mm_add_ps(_mm_mul_ps(x2, s0), r_line);
           
            s0 = _mm_set1_ps(b[i+3]);  // b_line = vec4(b[i][j])
            r_line = _mm_add_ps(_mm_mul_ps(x3, s0), r_line);
           
            _mm_store_ps(&m[i], r_line);     // r[i] = r_line
        }
    };


This lead to a significant increase in performance, and matrix multiplication runs in 0.000192.

I changed the multiplications to C = A*B (4x4 each) form, as this is a more natural operation. This time I change the SSE option in compiler between ENABLED and DISABLED for tests. All the tests were with the unrolled version of the code. There are two more important operations happening in this versions:
  • creation and identity load in intermediate matrix created for calculus of multiplications
  • attribution of the intermediate matrix to the C matrix
These two operations happen to increase in time to execute the tasks, and are described below.

SSE ENABLED in compiler:
Normal routine: 0.001592
SSE routine: 0.000236 (6,74x faster than in normal in this group)
Normal routine with memset to clear matrix: 0.0018

SSE option DISABLED in compiler (not set):
Normal routine: 0.000595 (weird, code was optimized with SSE here?)
SSE routine: 0.000236 (same as before) (2.52x faster than in normal in this group)
Normal routine with memset to clear matrix: 0.000804 (weird again)


Overall gains between worst and best cases was 7.83x

I clean the intermediate objects of the code, compile and test more than 3 times, to ensure that the correct code was being compiled. During the test of matrix multiplication, was identified that the load identity routine was taking too much time, specially because every time that multiply two matrices, a intermediate matrix is created, to store the result of the multiplication.

MATRIX IDENTITY
The first test used memset option plus 4 attributions, to clear the entire matrix.
In the second, I used a simple for loop to clear the matrix, and 4 attributions, which was much faster.

Identity speed:
Normal: 0.000217
Optimized: 0.000067 (3,23x faster)

I could not use SSE in this, because when the matrix is created, it seens not to be aligned (even with the flag float __declspec(align(16)) m[16]) causing segmention fault. As above stated there was a increase in 0.0002 seconds in memset version.

MATRIX ATTRIBUTION
Other identified source of slowdown was the attribution function of the matrices. The attribution between matrices used initially direct operation = between floats. I converted it to SSE and, as matrix data is aligned, the time to load the matrix reduces. All the above tests used the SSE version.

Attribution speed:
Normal: 0.000074
SSE: 0.000017 (4.35x faster)

Code
// SSE version

    matrix4x4f operator= (const matrix4x4f &aa)
    {
        __m128 a, b, c, d;
        a = _mm_load_ps(&aa.m[0]);
        b = _mm_load_ps(&aa.m[4]);
        c = _mm_load_ps(&aa.m[8]);
        d = _mm_load_ps(&aa.m[12]);
        _mm_store_ps(&m[0],a);
        _mm_store_ps(&m[4],b);
        _mm_store_ps(&m[8],c);
        _mm_store_ps(&m[12],d);
        return *this;
    };


I also used the alignment of several similar operations when possible to get better results, as well as I used the bigger number of the registers available. This case 4, but may be up to 8 (16 in 64 bits).

FINAL CONSIDERATIONS
The main intention of this was to use SSE. I yet do not test optimizations in SQRT calculations, which was the initial intention. However I achieve performance improvements in my code with the use of SSE instructions. Even improved things that I never had thought could consume time. Compiler options of the VC 2010 seen to affect in weird ways the behavior of the generated code. Maybe a inspection in the generate ASM code could identify better what the compiler did.

Memory alignment, clustering of instructions, unroll of loops, loadings and attribution of data via SSE registers can guarantee improvements in execution time.
The matrix calculations in my actual code are not heavy, and so not a problem. But I want to test Kinematics of several links, and I believe that in this scenario the matrix multiplication may become a topic of concern.

New posts about this soon.